PyMOL Beginner’s Guide (Pt. 1)
June 23, 2020 ☼ PyMOL ☼ Modeling ☼ Guides ☼ Proteins
PyMOL is one of the standard molecular modeling tools. From generating publication-quality figures to exploration rational design hypotheses, PyMOL can fit almost any modeling need. Getting started with PyMOL for the first time may seem daunting, but after a little practice, it will become one of the most powerful tools available. In Part 1 of this guide, I’ll introduce you to the fundamental skills needed to use PyMOL for basic modeling questions and figure creation. In Part 2, I’ll present four additional advanced techniques. Let’s get to it!
Note: This written guide is adapted from my PyMOL webinar for the Uytengsu Teaching Lab at Stanford University
Table of Contents
- Downloading and Installing PyMOL
- Breaking Down the User Interface
- Loading and Fetching Data
- Controlling the Camera
- Changing Representations
- Working with Selections
- Working with Objects
Downloading and Installing PyMOL
While the foundations of PyMOL are rooted in open-source software, Schrödinger mediates the licensing and distribution. If you are at an institution or company, check with your departments if they have a site license and follow their instructions for proper installation. If you don’t have access to a site license, navigate to the PyMOL website to purchase a license and download the software.
Breaking Down the User Interface
After launching PyMOL, you’ll be greeted by the following user interface (See Fig. 1). Don’t worry if this interface feels confusing or daunting at first! Before we dive into using PyMOL, let’s break down this user interface into its five components.
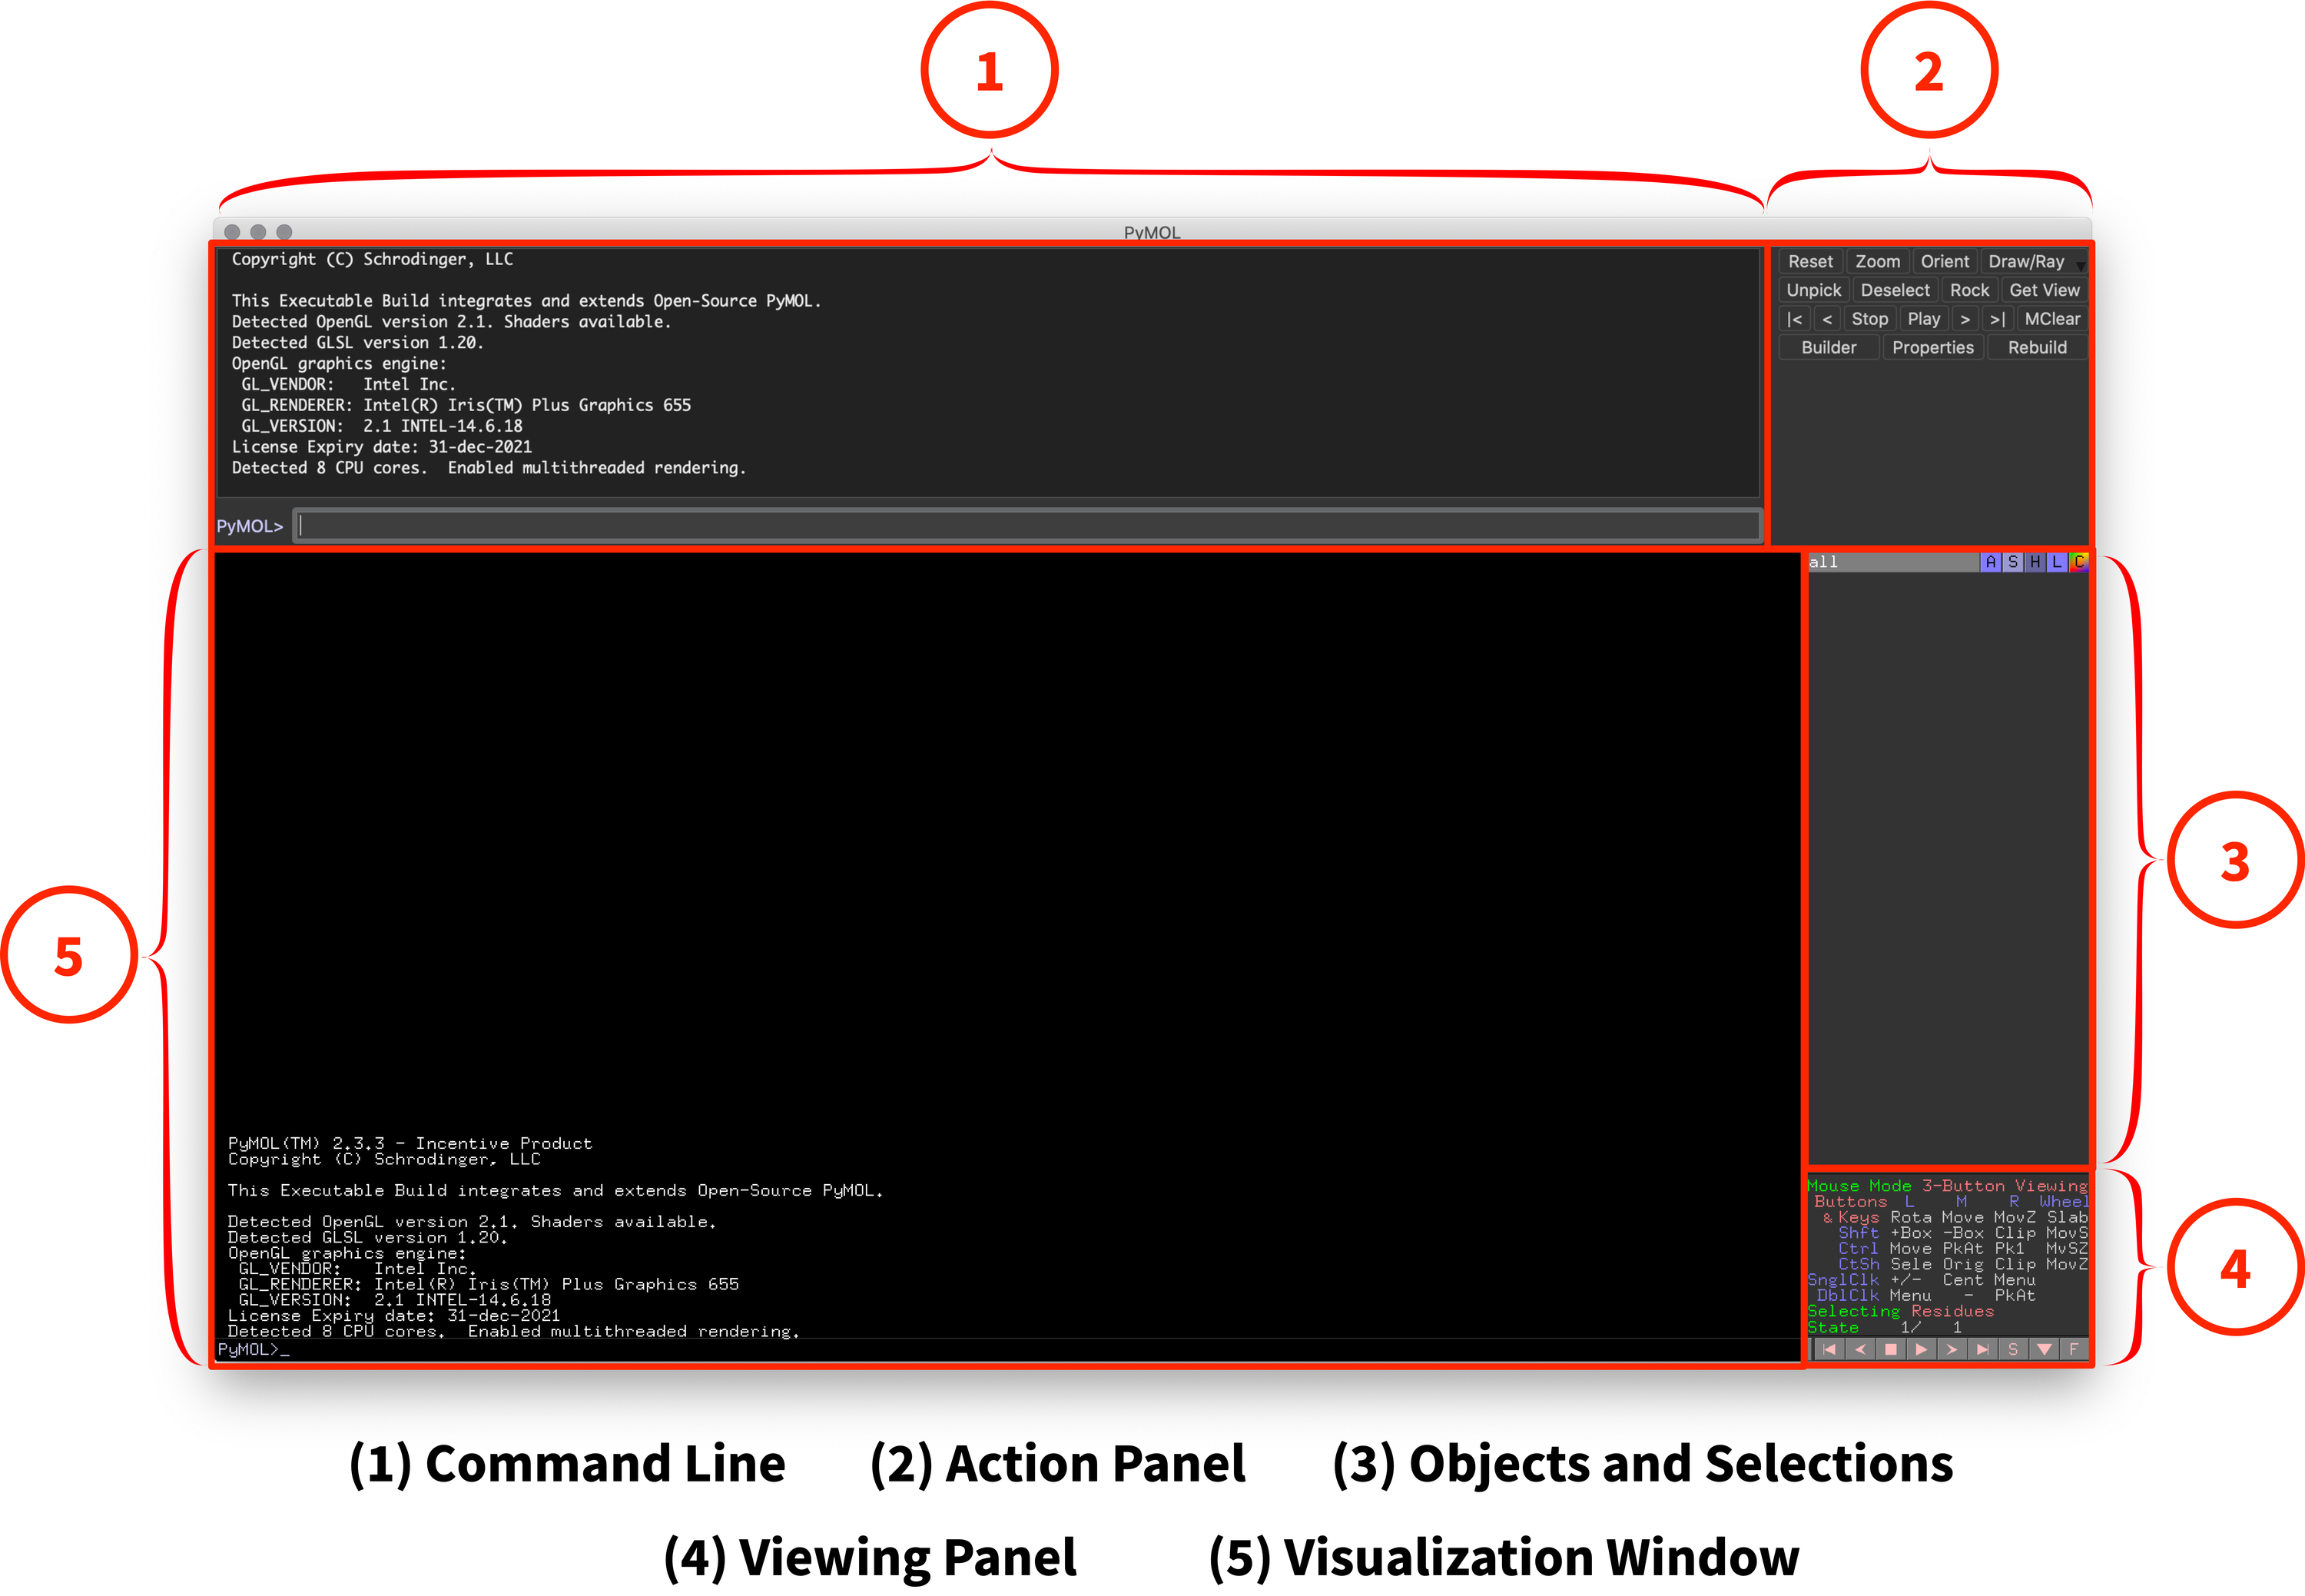 Fig. 1: Overview of PyMOL’s User Interface
1. Command Line
In addition to a user interface, PyMOl comes with a command line to interact with your visualizations using text-based commands. These commands enable complex manipulations that are much faster than using the user interface and complex scripting (outside of the scope of this intro guide). I’ll introduce how to use the command line and useful commands throughout this guide.
2. Action Panel
The action panel provides a series of buttons for common actions. Clicking on these buttons will initiate those commands as an alternative to typing them in through the command line. Personally, I find the most useful button is the “Draw/Ray” button (used to generate images).
3. Objects and Selections
The objects and selections panel is the second-most important part of the user interface. It displays all of the objects or selections (I’ll introduce these later on in the guide), allows you to toggle them on and off, and provides buttons for a variety of actions.
Each item in this panel comes with a set of five buttons next to their name:
- A (Action): Object/selection manipulation
- S (Show): Turn on different representations/visualizations
- H (Hide): Turn off different representations/visualizations
- L (Label): Add textual labels to your model
- C (Color): Control color of object/selections using built-in presets
4. Viewing Panel
The viewing panel provides quick reference and changes for mouse controls, video and frame controls (outside of the scope of this guide), and a toggle for the sequence map (S button). It’s often beneficial to have access to the sequence map, as it provides a color-coordinated map of your molecule, including what atoms are selected.
5. Visualization Window
The visualization window is the essential part of the user interface, as it is the primary way you’ll be viewing and interacting with your molecular model. When starting PyMOL, it will display some startup text, but that’ll be replaced once you start working. In addition to viewing your model, the visualization window accepts mouse click inputs for additional controls (introduced throughout the guide).
Loading and Fetching Data
Now that you’re familiar with the user interface, the next step in using PyMOL is loading in data. PyMOL accepts a variety of molecule formats, but the most common one you’ll use is the .pdb file. For most examples, you can find these files directly from the Protein Data Bank. If you have a PDB file, you should be able to double-click the file to open it in PyMOL directly.
Like many PyMOL actions, you can also use the command line to load and fetch data instead. Below are the two common commands you can use. Fetch is particularly important since it enables you to pull in data directly from the PDB using the PDB ID without going to the website.
# Loads PDB or PyMOL session from the specified file on your computer
load {file}

# Fetch ID directly from the PDB
fetch {pdb-id}
Once you load in data, you’ll see the molecule loaded in and visualized in the visualization window.
Hands-on Exercise 1: Use the fetch command to retrieve a small mini-protein example (PDB: 5JG9)1.
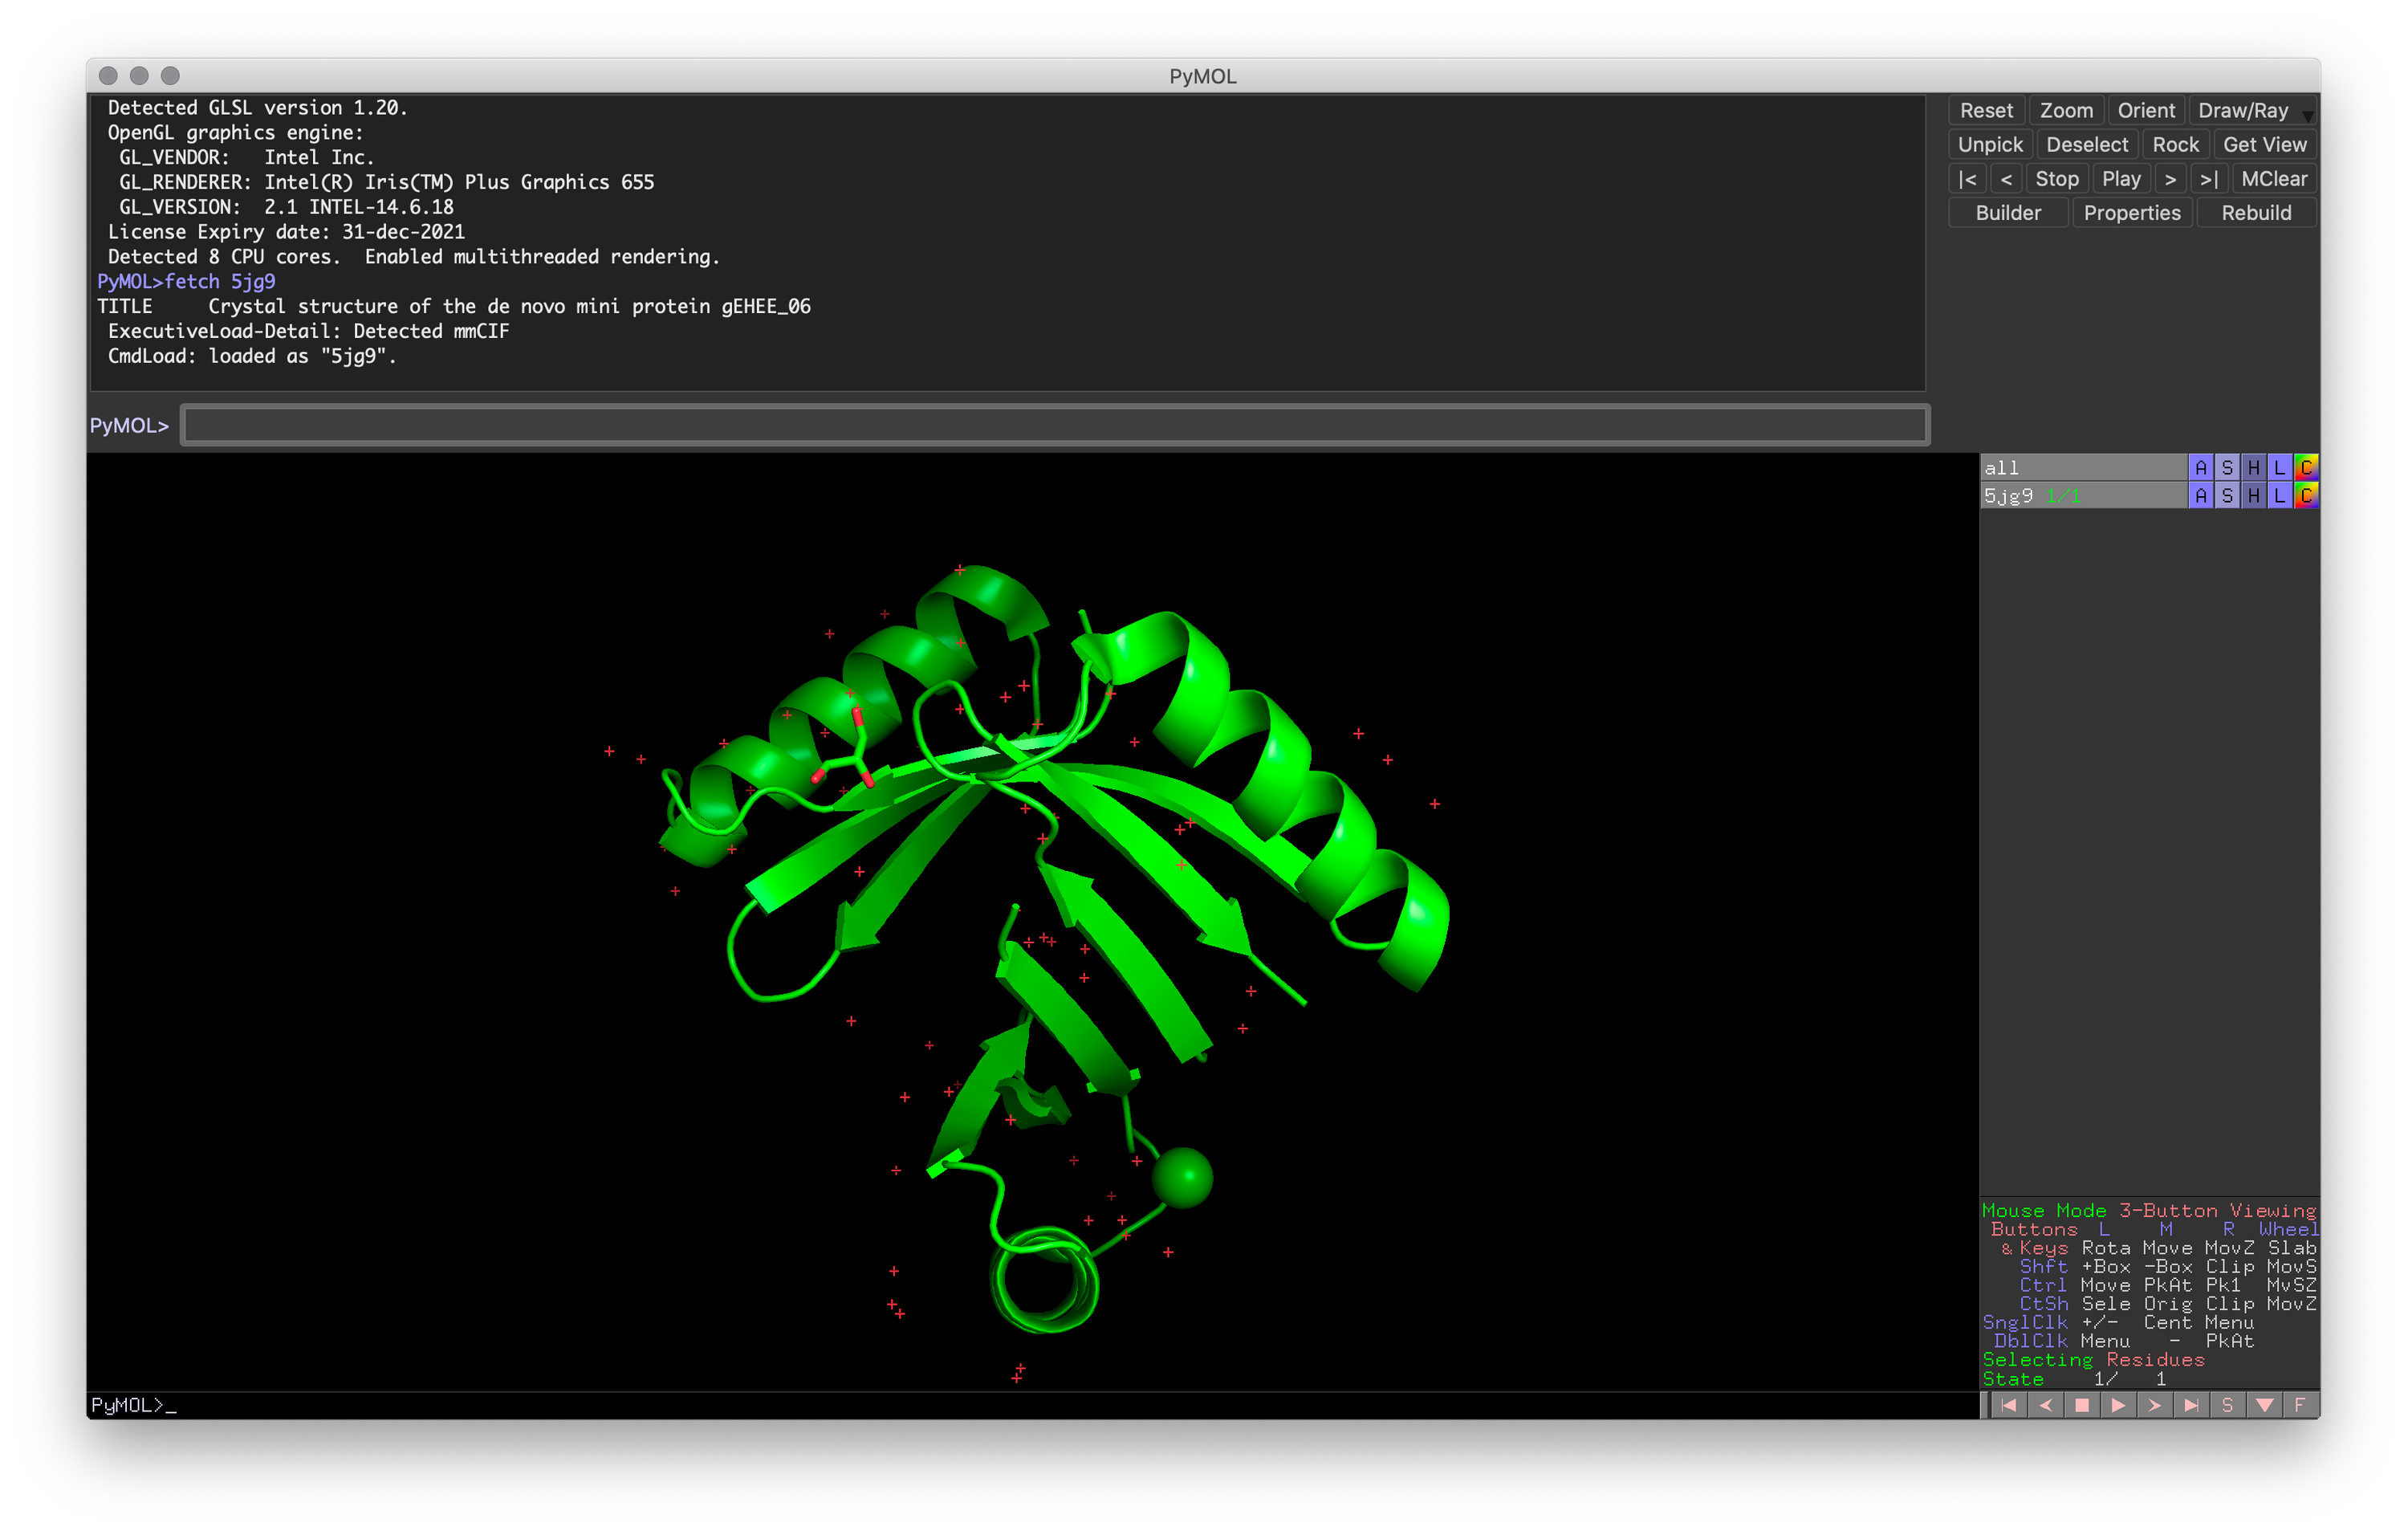 Exercise 1: PyMOL window after loading in the mini-protein (PDB: 5JG9)
Controlling the Camera
There are four basic camera controls in PyMOL (assuming a three-button external mouse):
- Rotation: Rotate the view around the central point
- Left Mouse Button
- Translation (Move): Move the central point up/down, left/right (X-Y axis)
- ⌥-Left Mouse Button
- Zoom: Zoom in and out from the central point
- Right Mouse Button (Move mouse forward and backward)
- Clipping: Adjust visible region by adjusting Z-axis planes
- Scroll wheel
The key to mastering camera control is to visualize the central point’s location and position it on or near the atom or residue of interest. In addition to manually moving the camera, PyMOL offers two ways to center the point onto specific atoms.
- ⌘-Left Click the atom of interest
- Use the “Center” command:
center {selection-expression}
When first starting (and even after mastering the controls), you may find yourself wanting to return the camera to the original state. To do so, you can use the reset command.
Hands-on Exercise 2: Try to recreate the chlorine-centered image using the camera controls (including clipping). Once done, use the reset command.
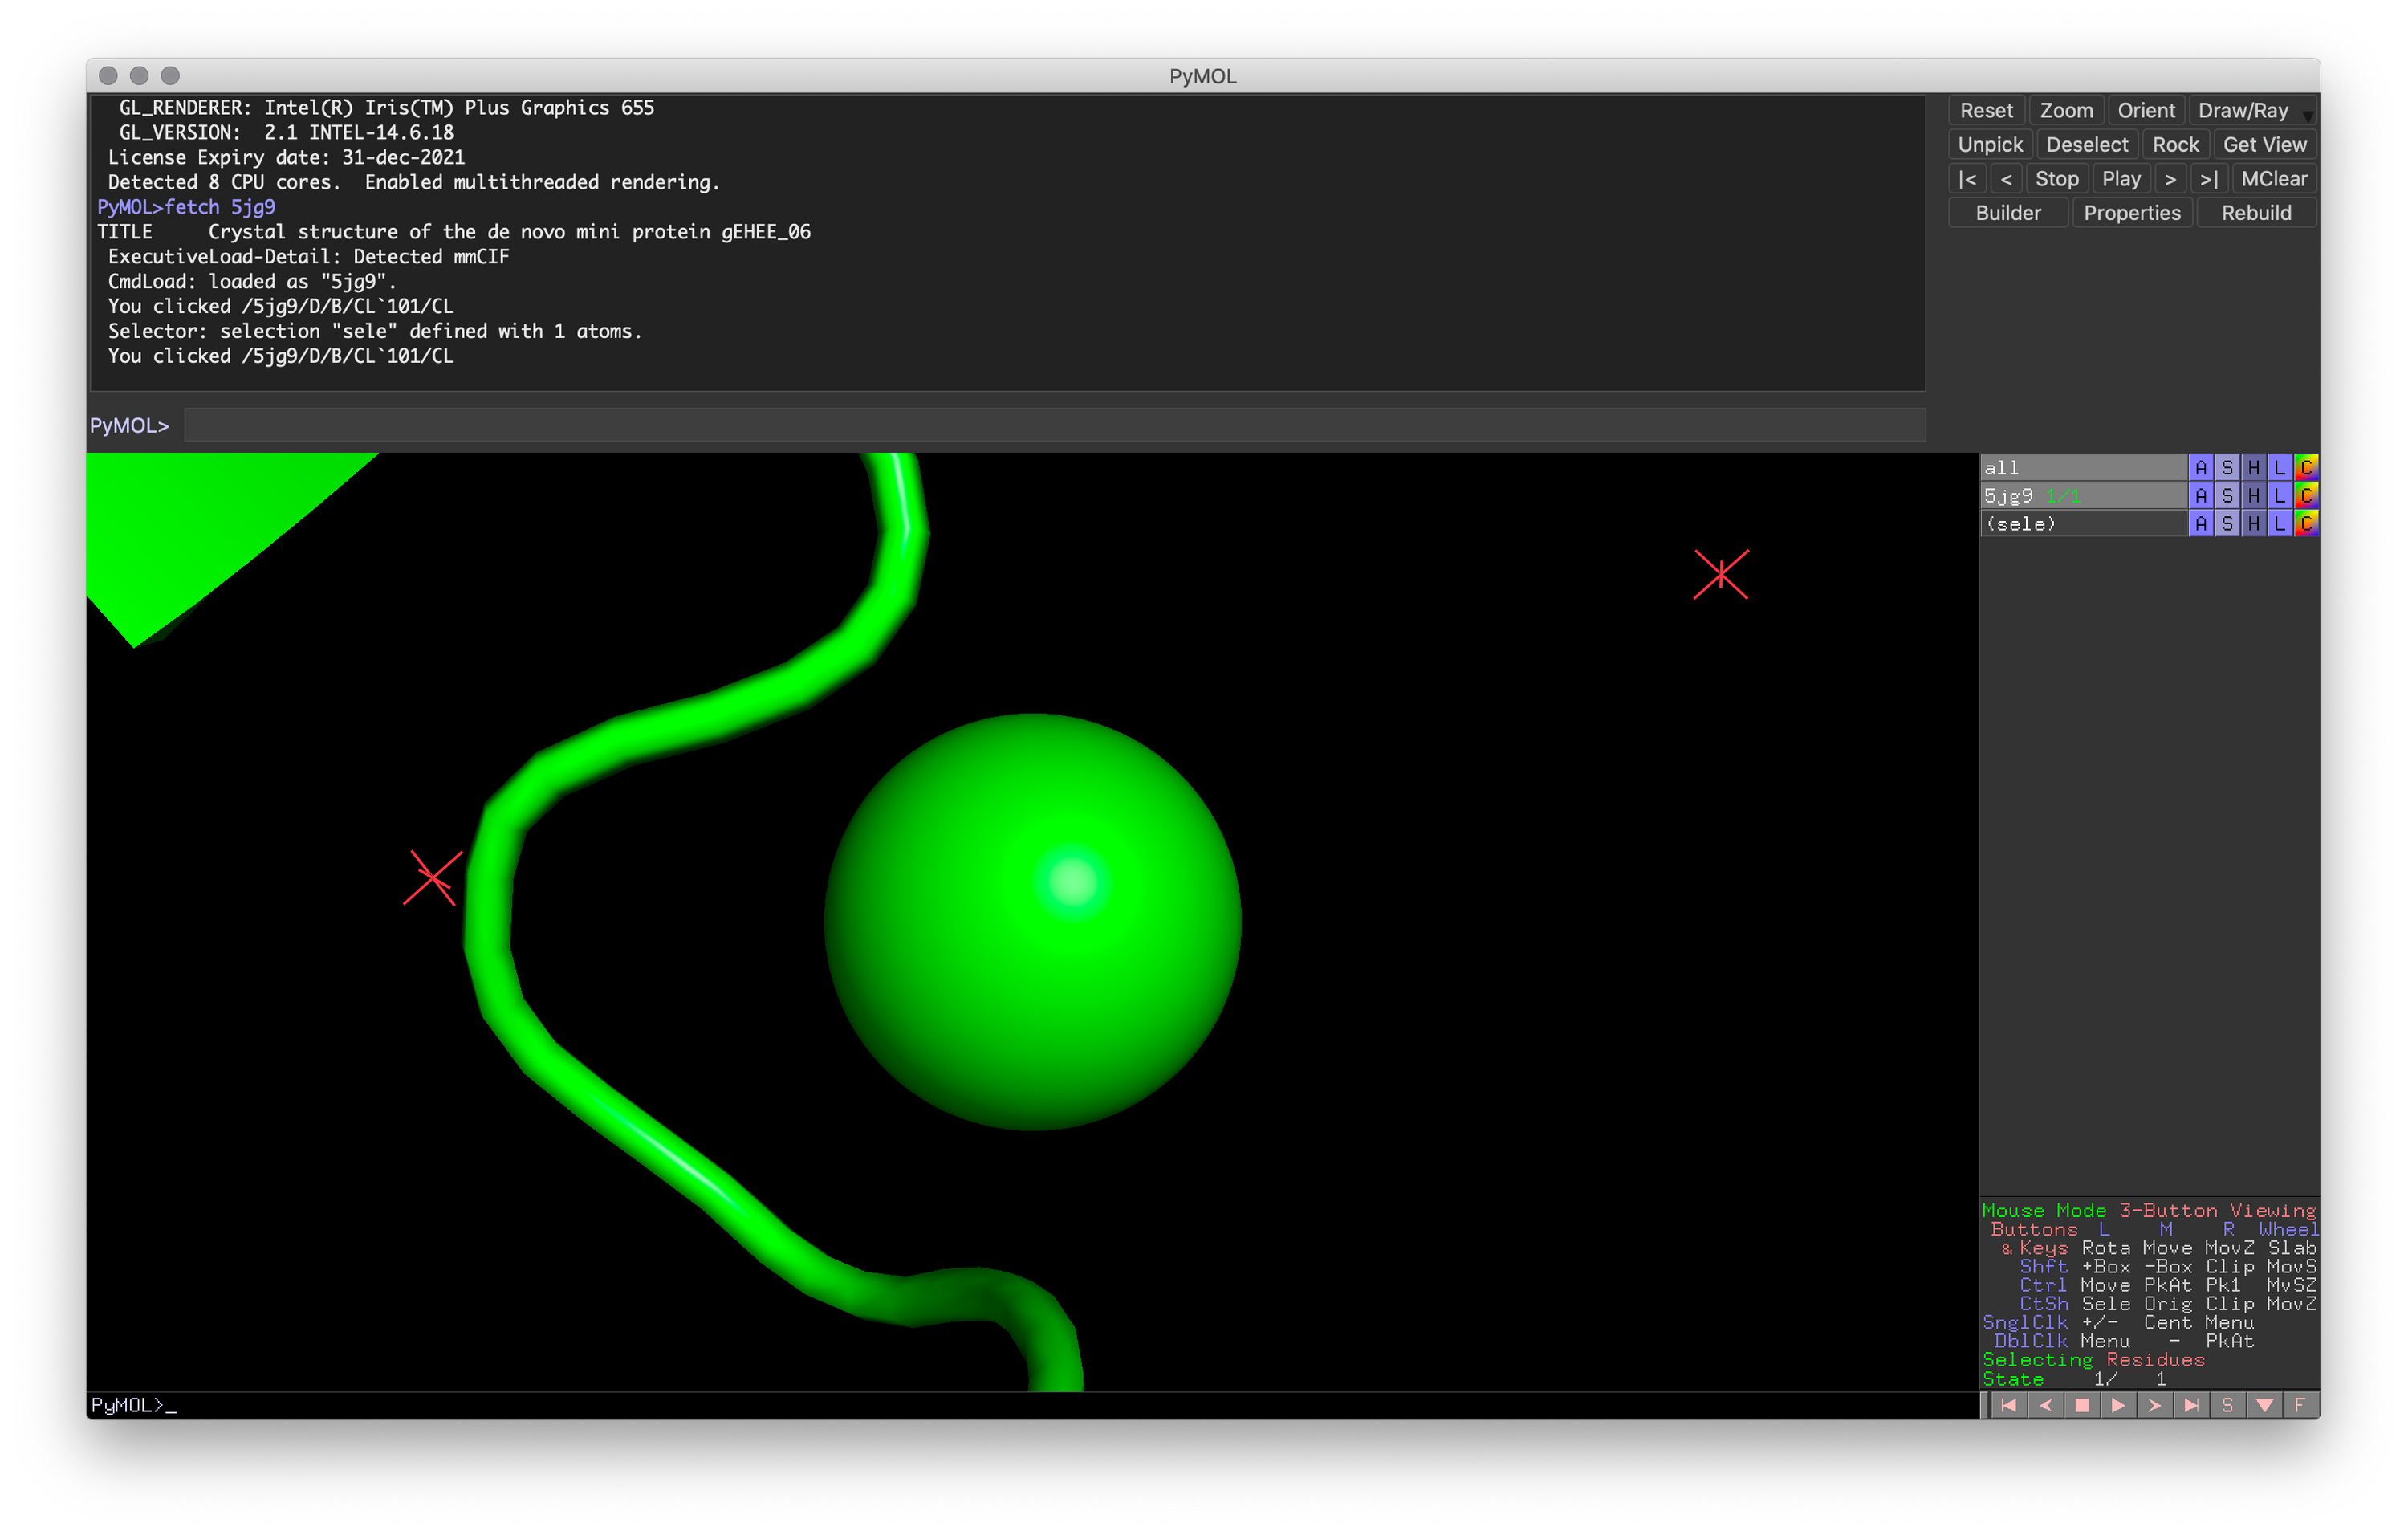 Exercise 2: PyMOL window for visualizing loop coordinating with the chlorine atom
Changing Representations
As a molecular modeling software, one of PyMOL’s greatest strengths is enabling you to model your molecule with various representations. These representations can help you highlight specific aspects of the molecule with clarity and precision.
Common Representations and Uses
- Cartoon: Ideal for visualizing secondary structure
- Sticks: Visualizing individual atoms while retaining connectivity
- Ribbon: Simplified backbone representation
- Spheres: Approximate Van der Waals radius to explore steric clashes or fit
- Surface: Approximates surface exposed to solvent, great for protein-protein or protein-ligand interactions.
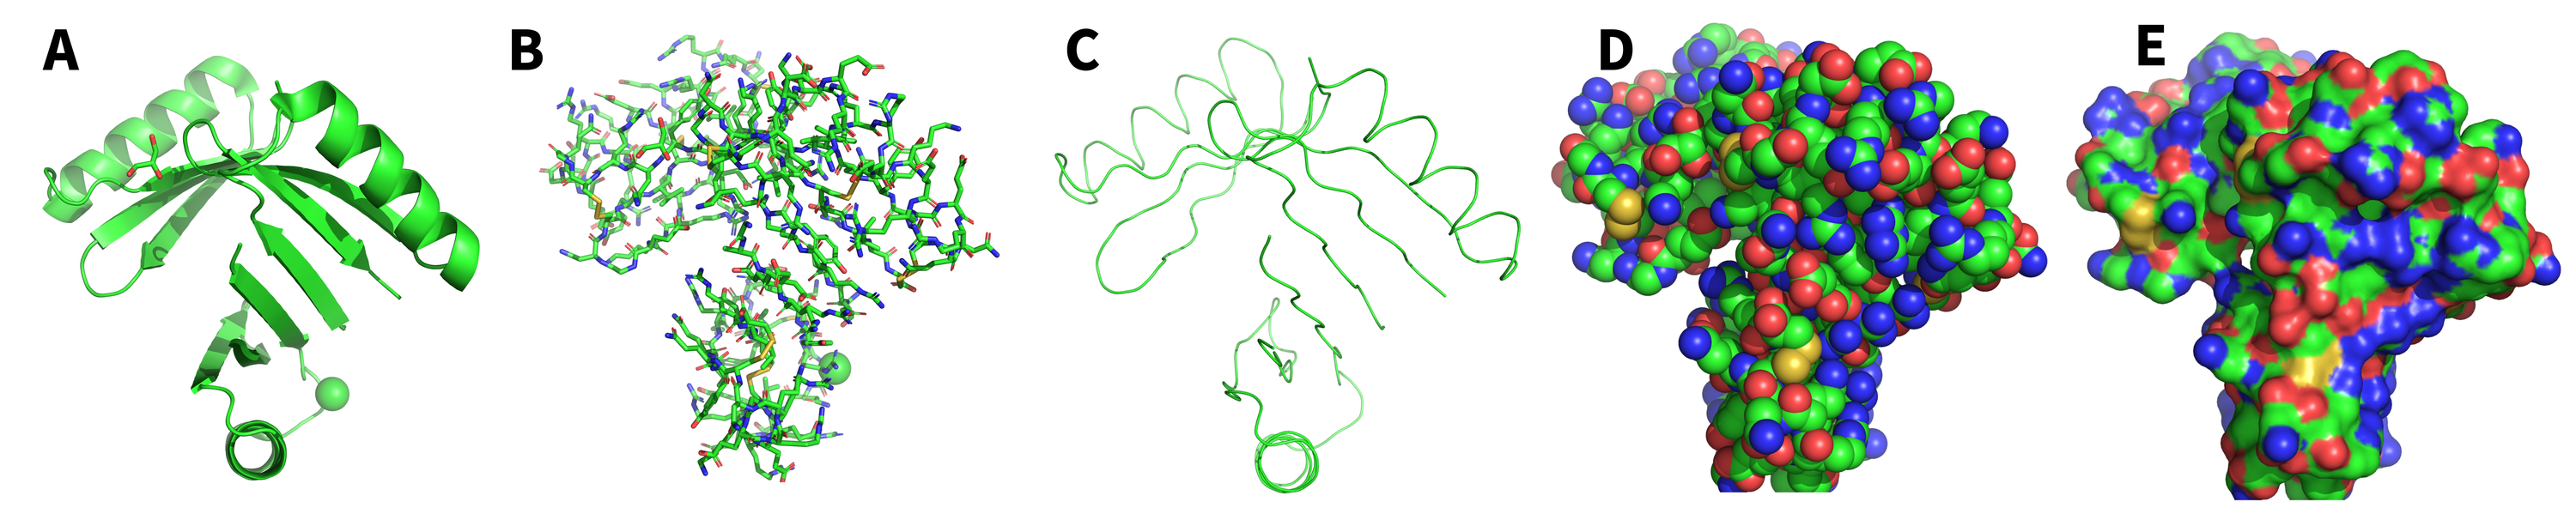 Fig 2: Example of the five common representations. (A) Cartoon; (B) Sticks; (C) Ribbon; (D) Spheres; (E) Surface
Hiding and Showing Representations
Representations can easily be hidden or shown in the viewer window using the Hide and Show buttons in the user interface or by using the following commands:
# Hide Representation
hide {representation}, {selection-expression}

# Show Representation
show {representation}, {selection-expression}

### Examples ###

# Hide cartoon representations
hide cartoon

# Show spheres representations
show spheres

# Show sticks representations for chain A
show sticks, chain A
Coloring
In addition to changing the type of representation, you can also control the color down to the single atom. Like controlling representations, you can change colors using PyMOL’s presets through the “Color” button in the user interface or by using the “color” command:
color {color}, {selection-expression}With the color command, you can pass in a variety of common color names (E.g., blue or blue) or more complex color controls (E.g., passing RGB values). You can find a full list of named colors here.
Hands-on Exercise 3: Change the representation to a cartoon representation with a different color for each chain.
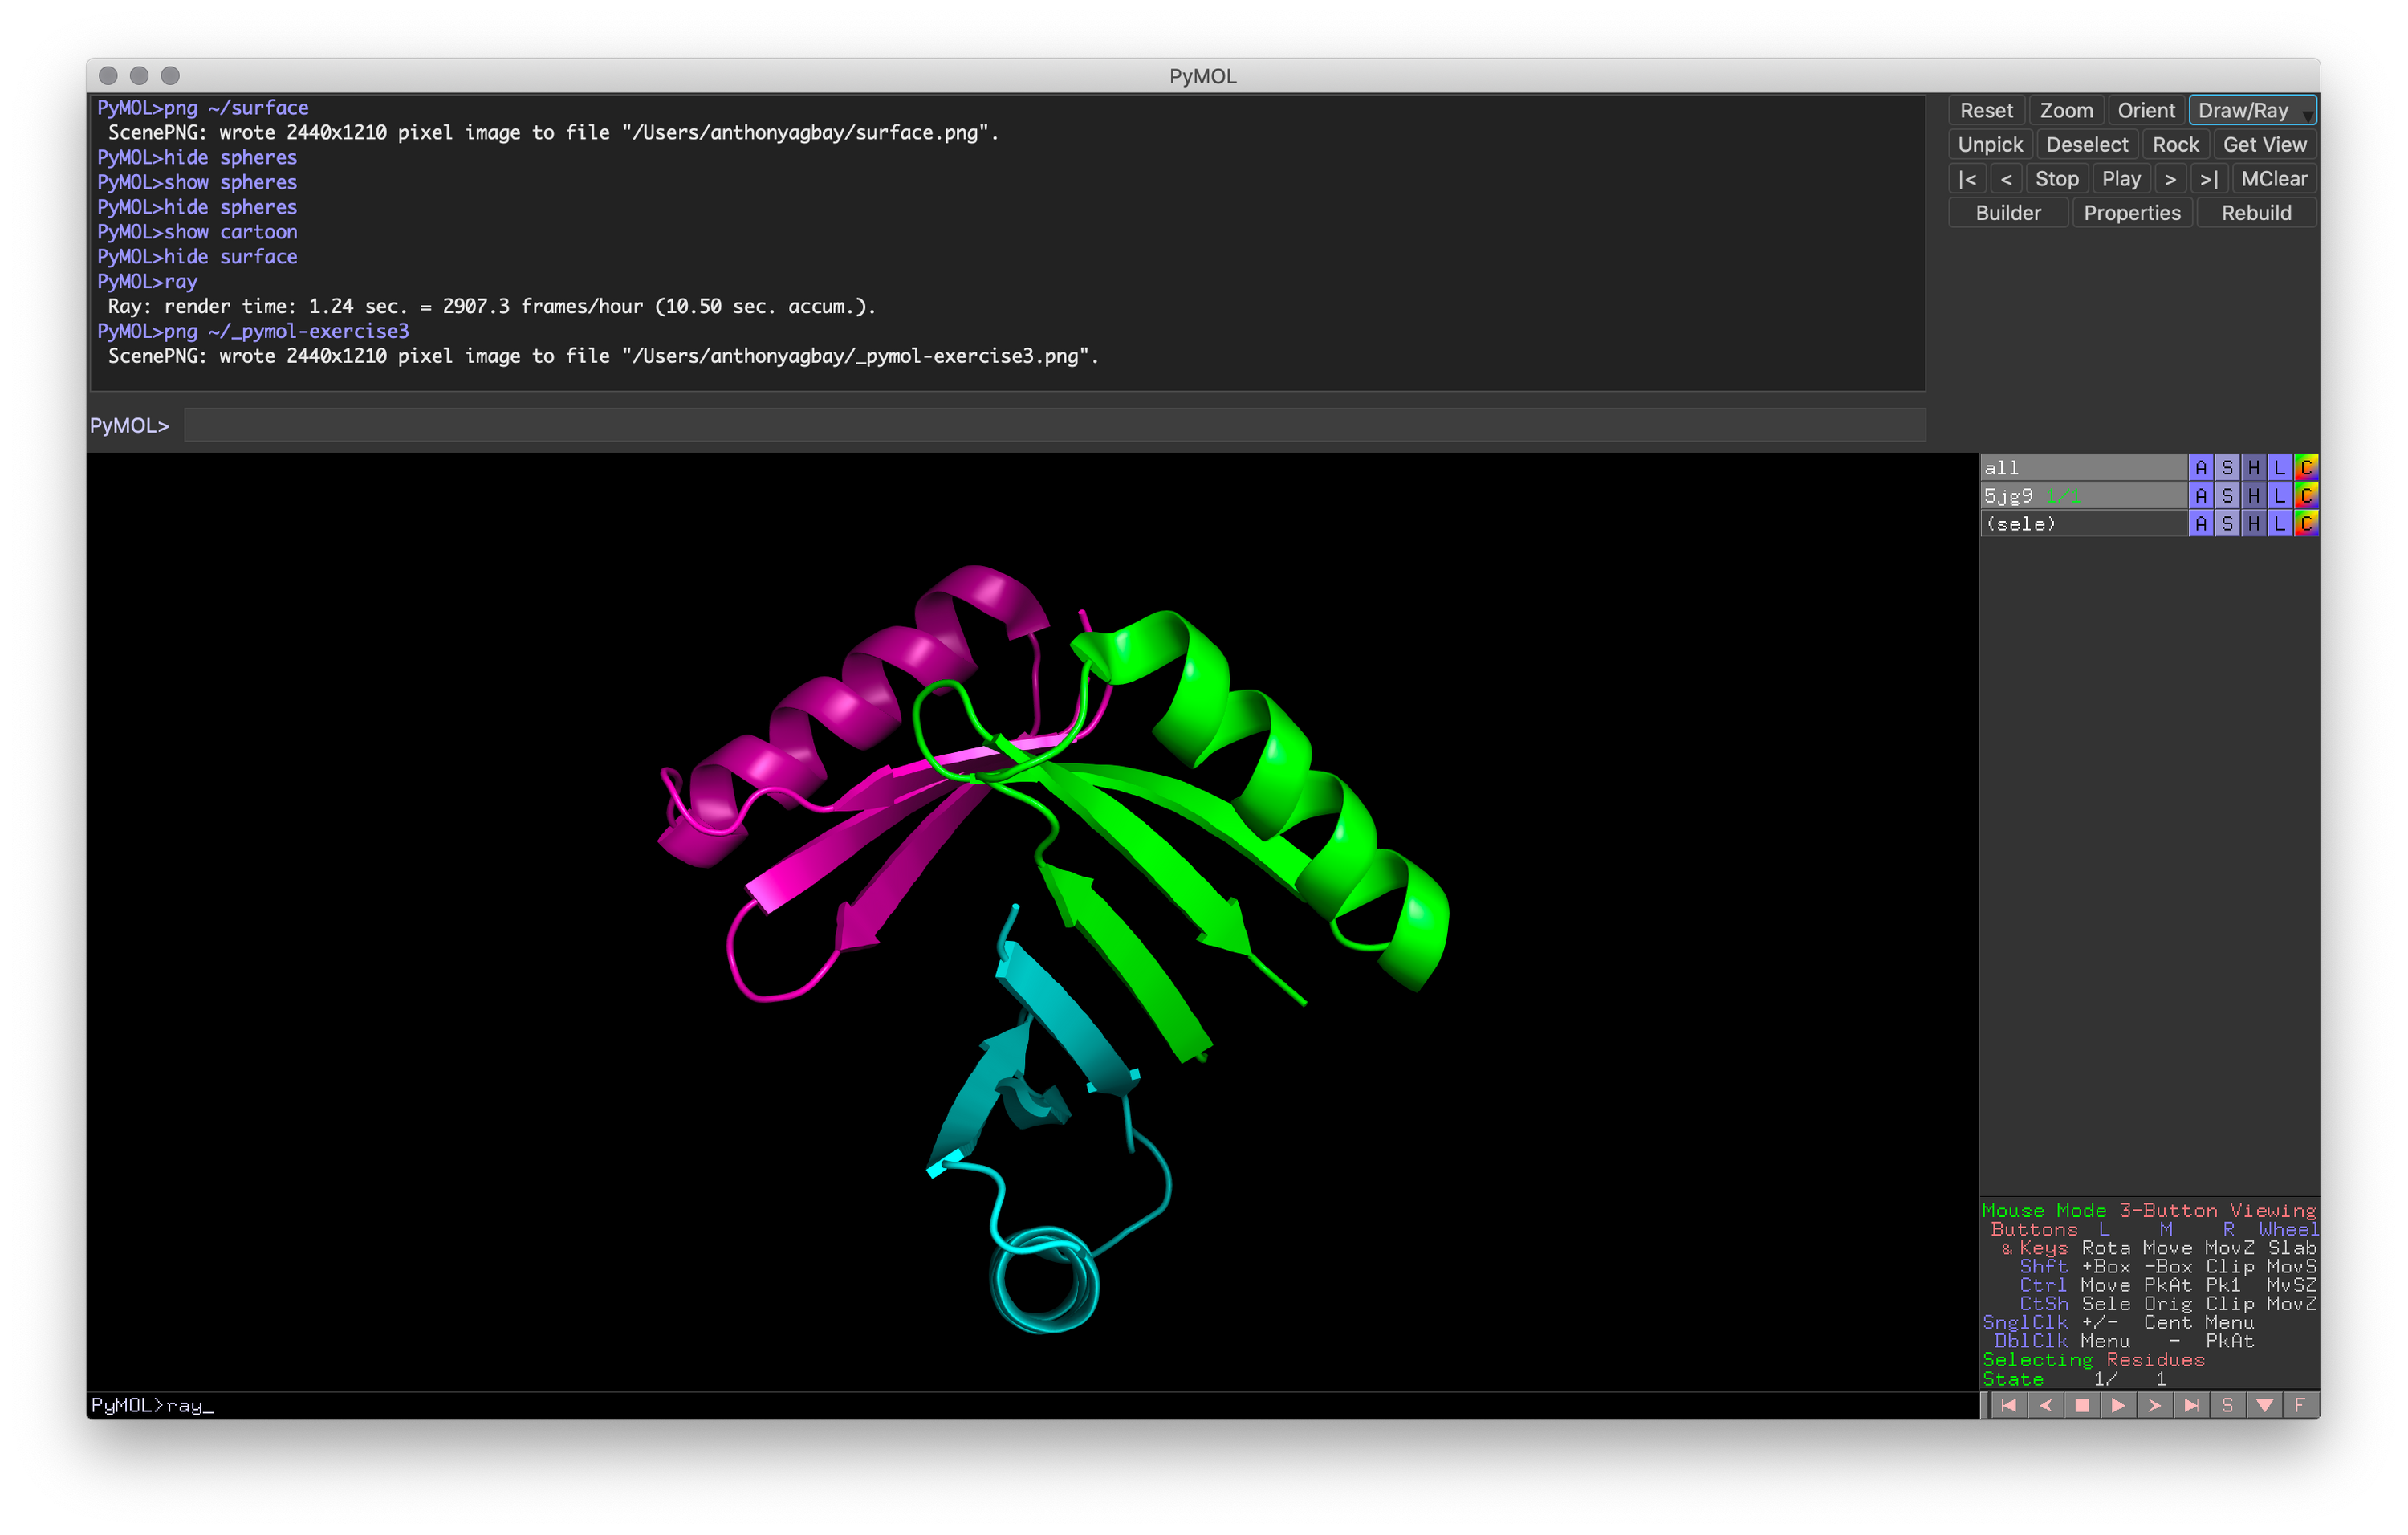 Exercise 3: PyMOL window with target representation and color
Working with Selections
You’ve now learned how to work with and model an entire object! Next, you’ll learn how to interact with a subset of an object using selections.
Selections are the way you operate on a subset of atoms in an object. For example, you may want to color only the residues around a ligand or view a subset of residues in the sticks representation while keeping the cartoon representation. You can always manage selections through the mouse and user interface or commands on the command line.
Hands-on Exercise Step: Reset your representation and load in the sticks representation.
Mouse Selections
Creating subsets with the mouse is as simple as left-clicking the target item. Once you left-click on an item, you’ll notice two changes:
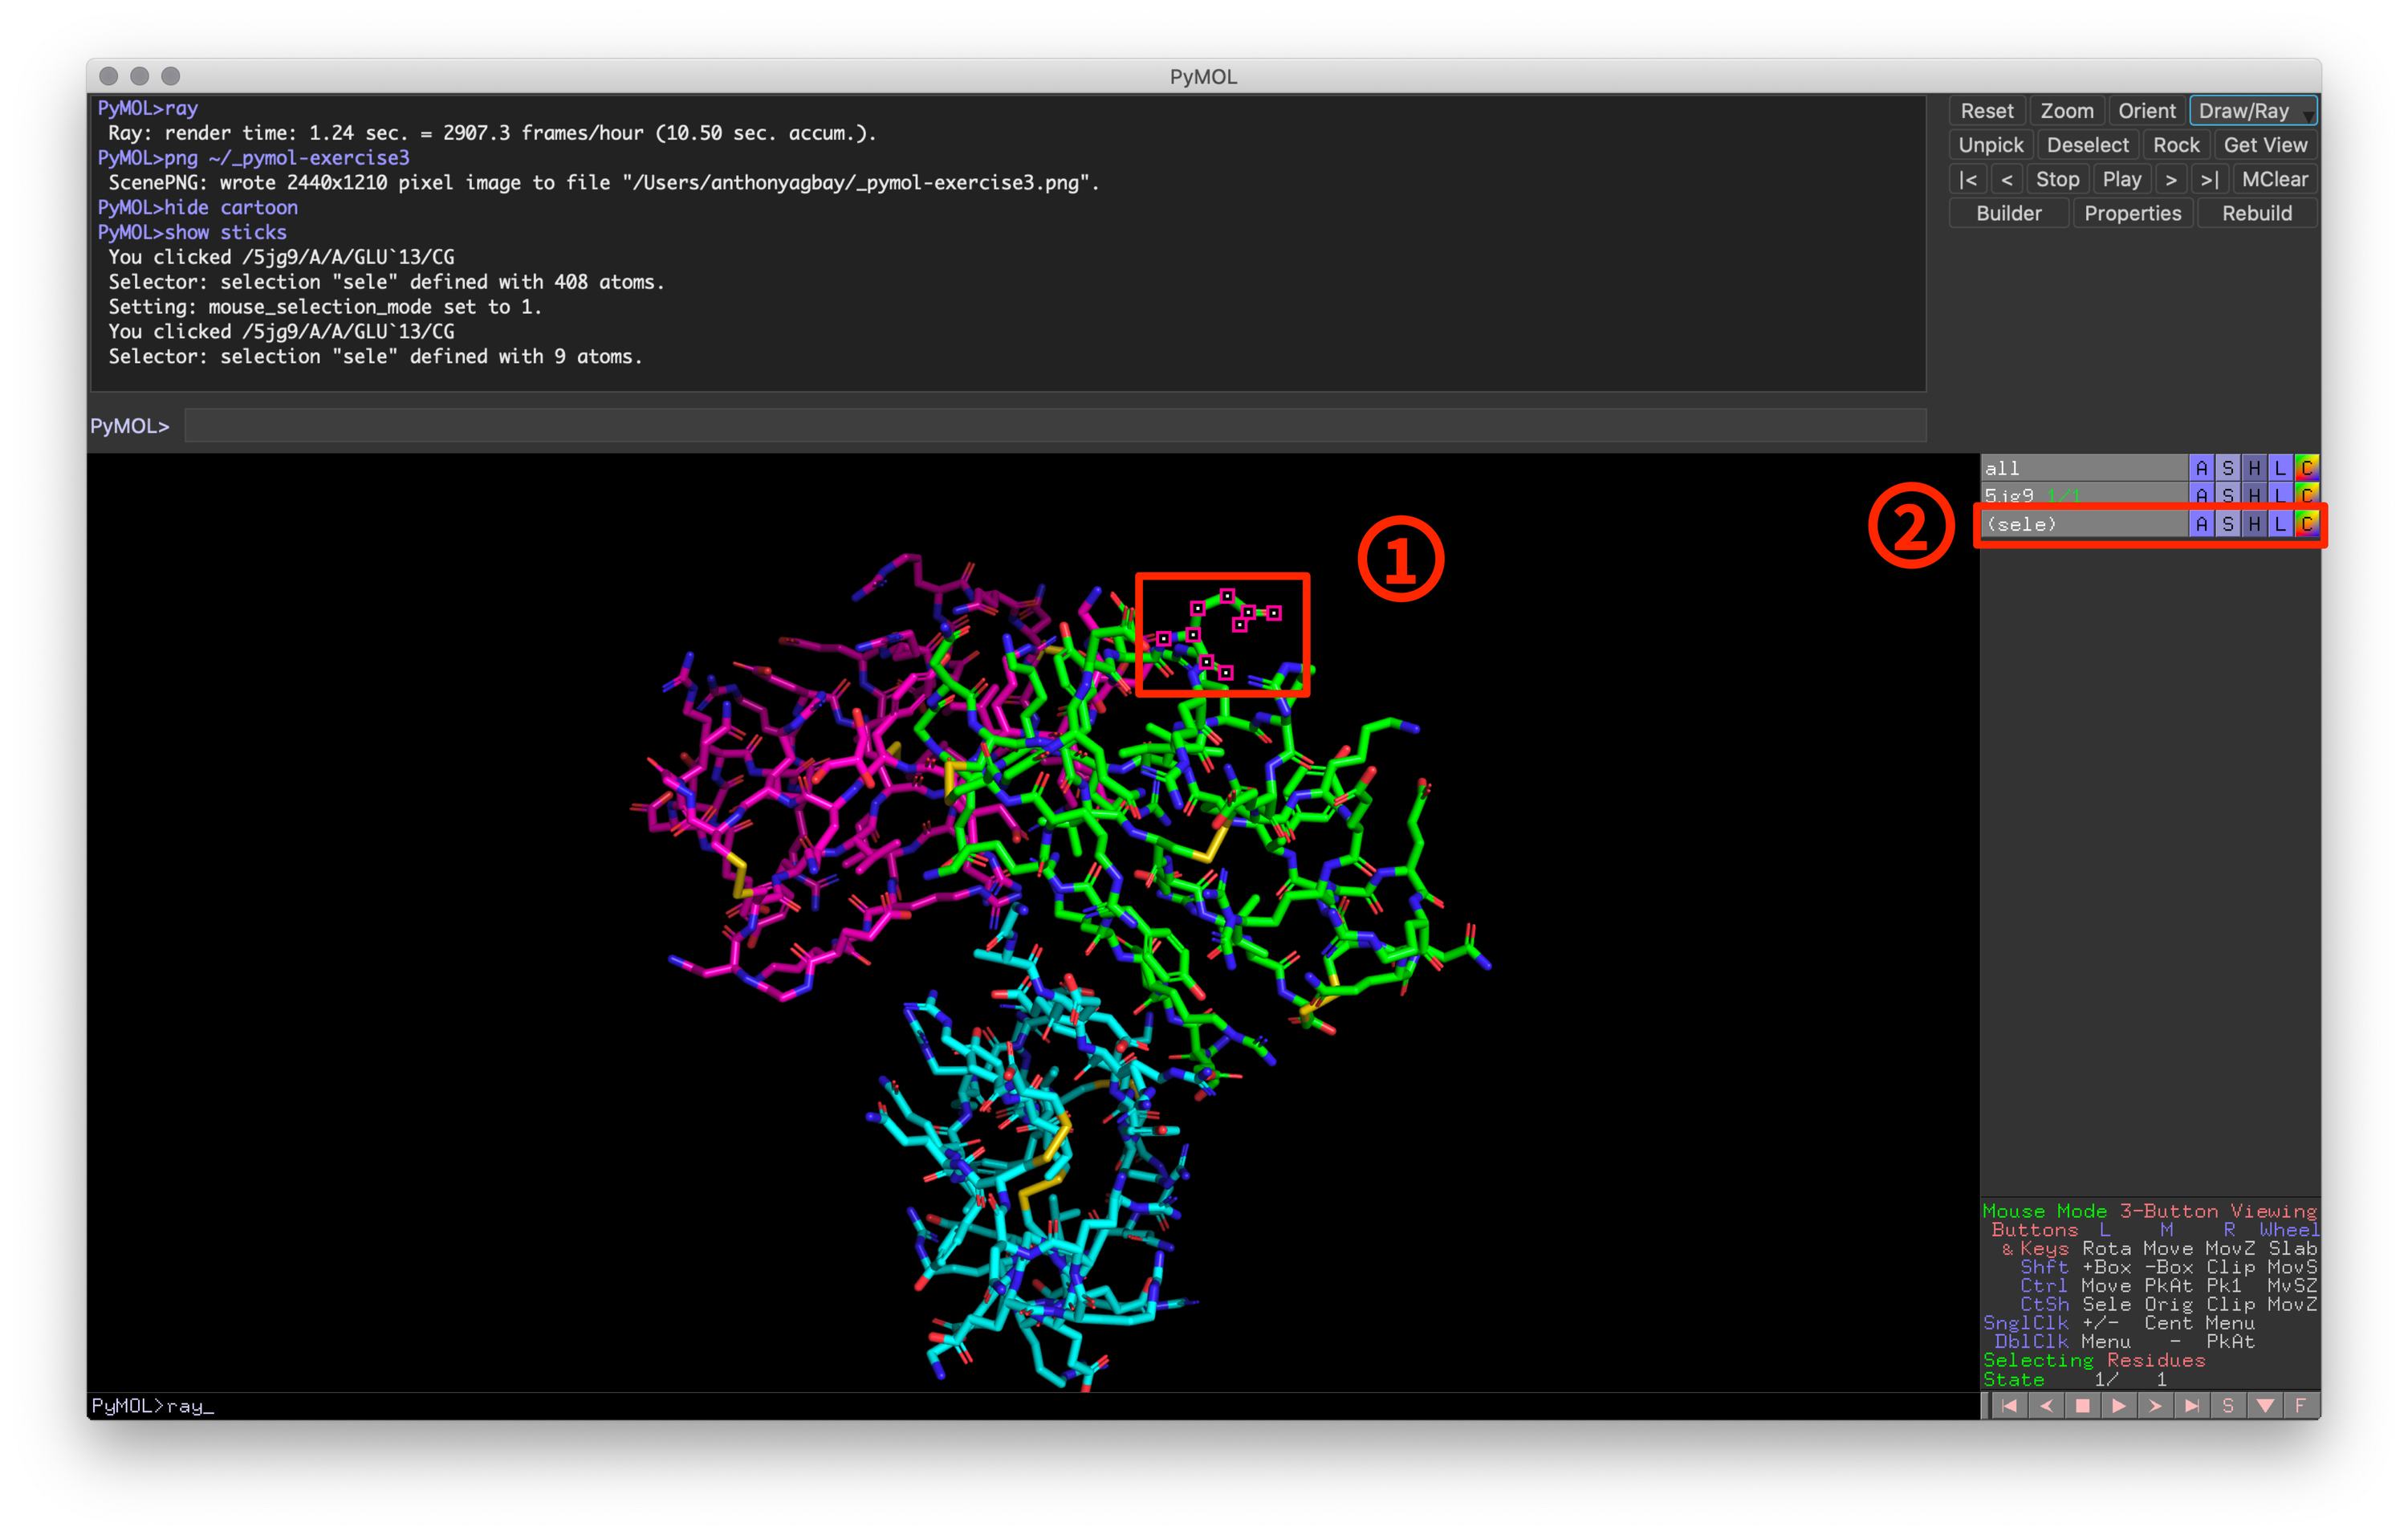 Fig 3: Example of PyMOL window after selecting a residue
- A pink and white dot in the visualization window will appear on all atoms that are currently selected.
- A “sele” selection will appear in the objects and selections panel with a light gray background.
Unlike an object, a selection will have parentheses surrounding the name and lacks the green structure counter for NMR structures (outside of the scope of this guide). When activated, the selection will have a light gray background and the active atoms show up in the visualization window. When deactivated, the selection has a dark gray background and the corresponding atoms are no longer shown as active. To deselect atoms, simply left click the activated atoms and they will no longer be part of your selection.
In addition to these changes, you should also notice that the command line window provides an output to describe what you have selected. This output takes the following format:
You clicked /{object}/{pymol-counter}/{chain}/{residue}/{atom}- Object: Object name as shown in Object and Selection pane
- PyMOL Object Counter: PyMOL-specific counter for each molecule
- Chain: Chain as defined in the PDB file
- Residue: Residue information, including 3-letter code and residue number
- Atom: Atom name
Hands-on Exercise 4: Recolor the structure by secondary structure and recolor the the first loop in chain A to blue(should be the loop at the front center of the molecule after using the reset command).
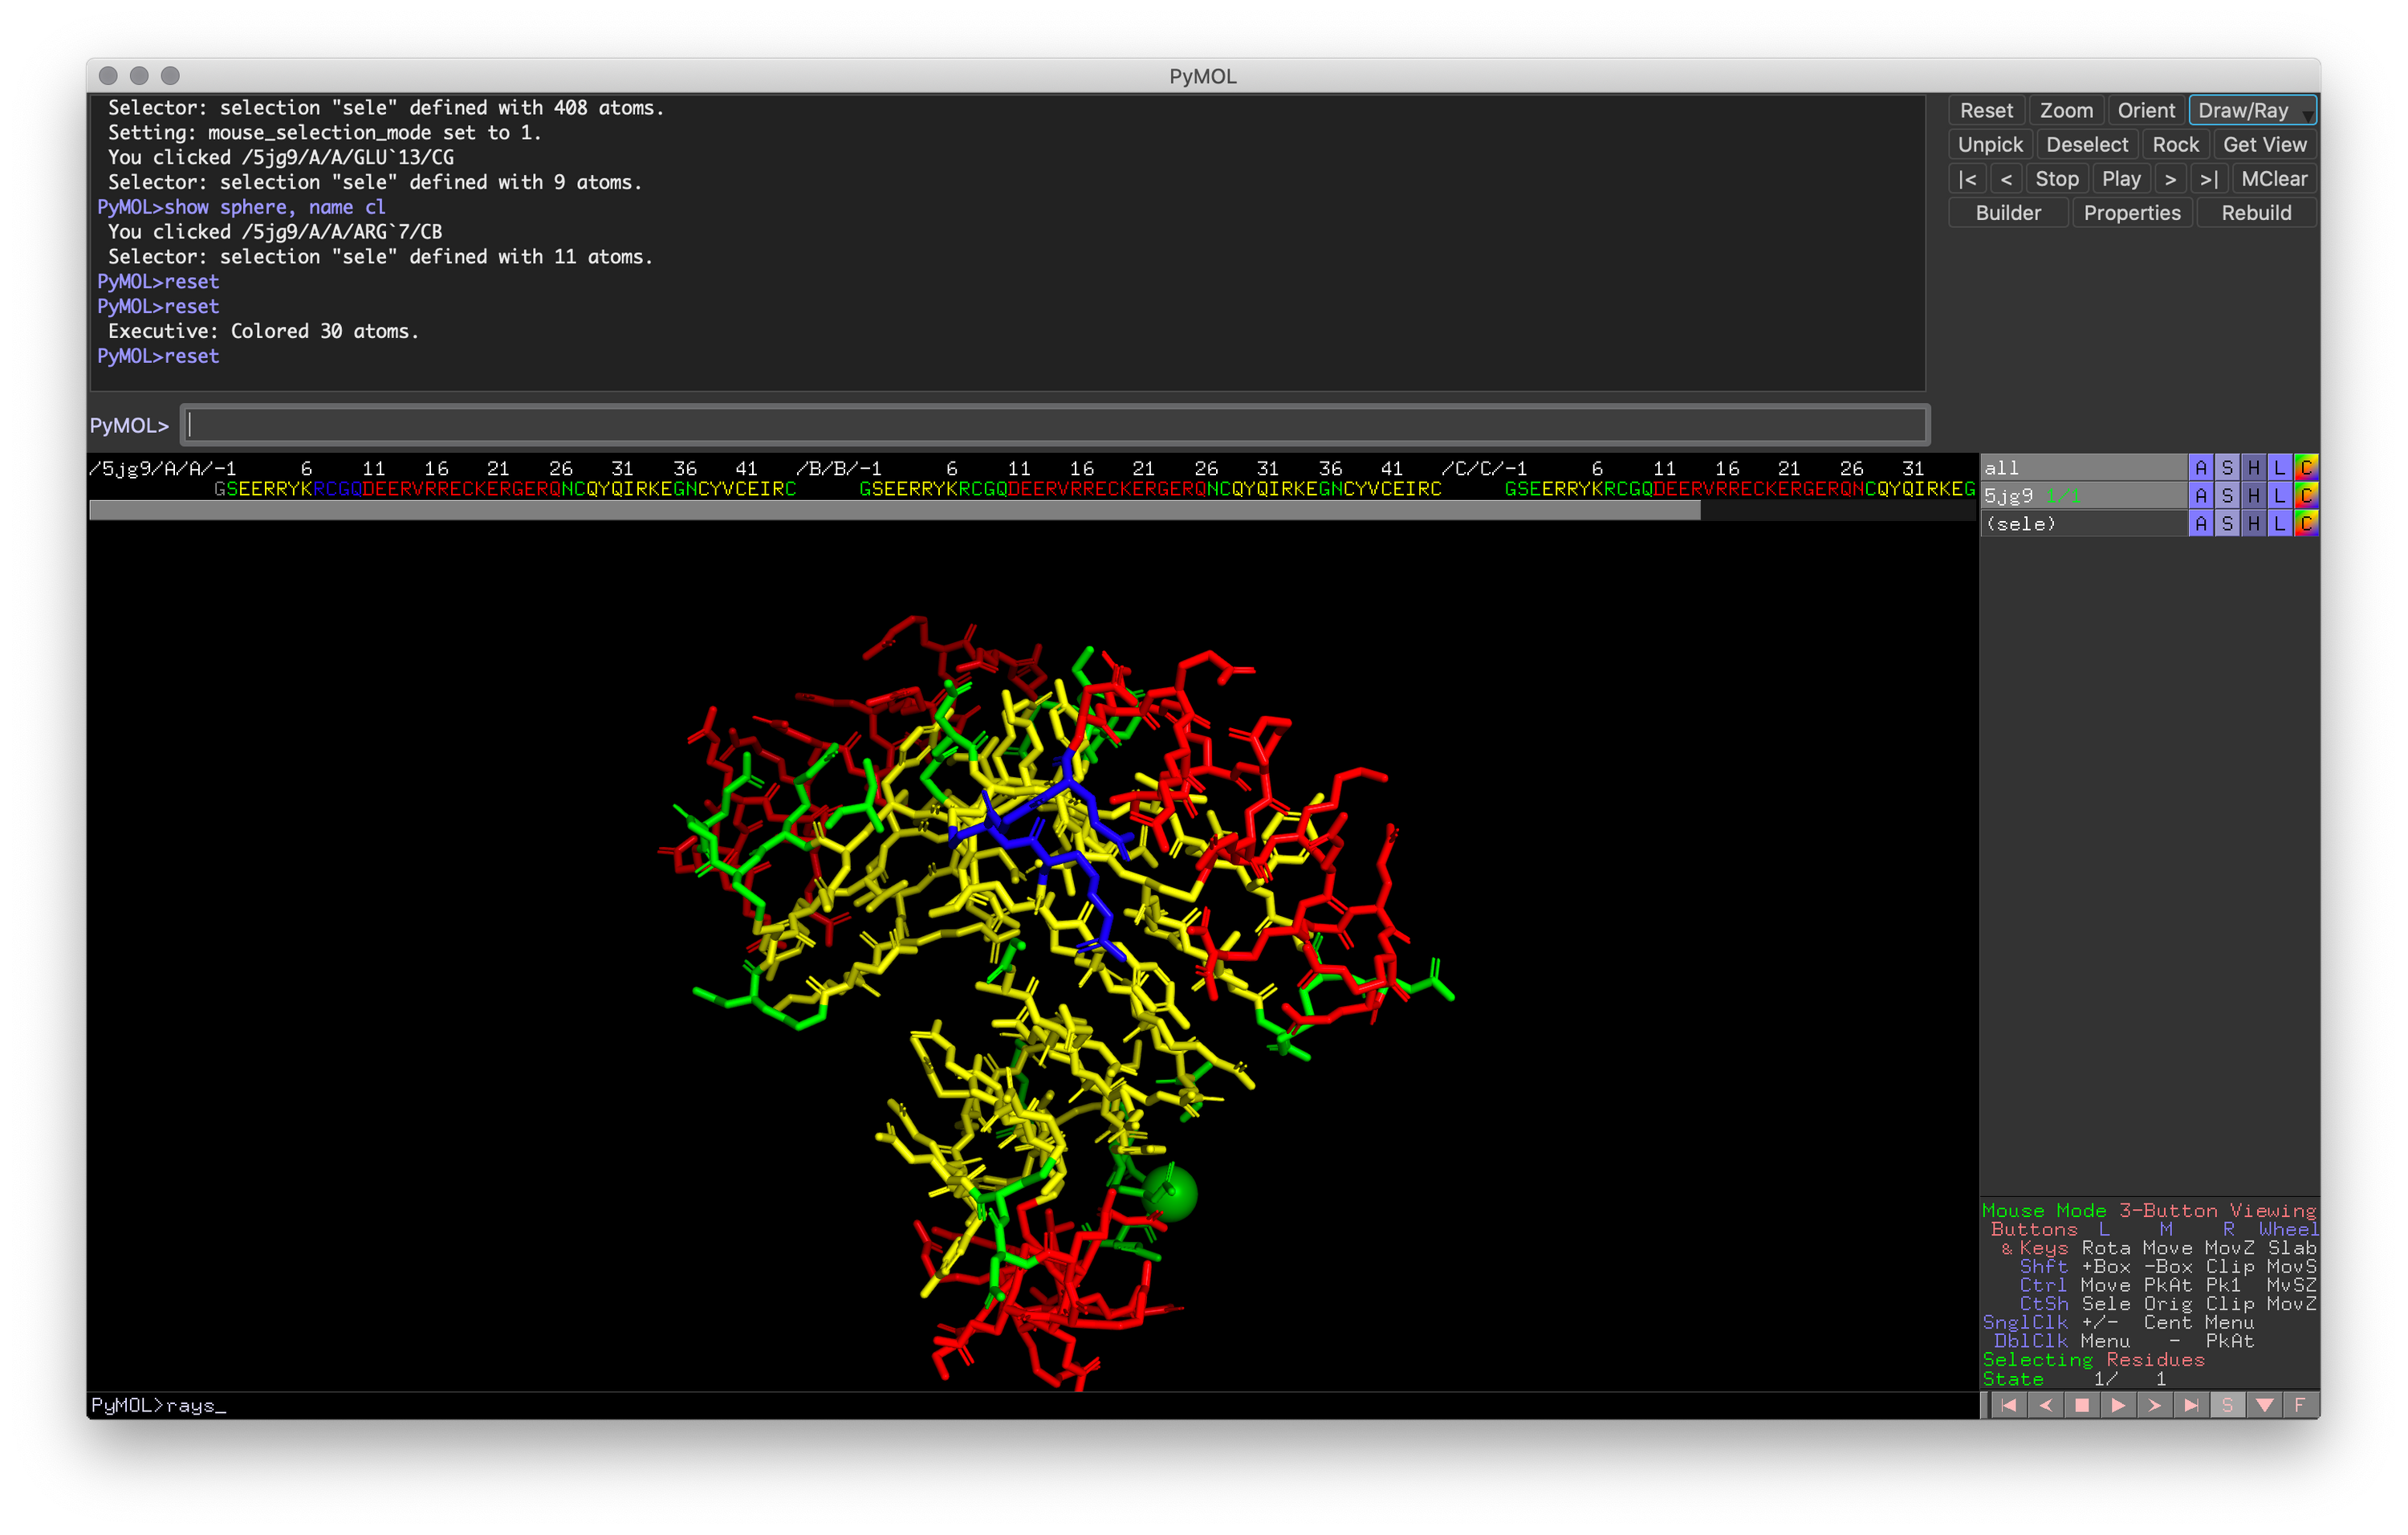 Exercise 4: PyMOL window with the correct loop colored blue
“Sele”: A Special Temporary Selection
If you start playing around with these selections, you may find yourself running into problems with the “sele” selection not saving the selected atoms properly, especially if you had just deactivated it. Don’t worry, it’s not a bug. “Sele” is a special selection name that acts as the temporary selection whenever there is no selection active. It’s good practice to always rename the “sele” command if you know you will want to reuse the selection going forward. There are two ways to rename a selection.
- You can use the blue Action button next to the selection to rename it.
- You can use the
set_namecommand in the command line:
# Set_name Command
set_name {sele-to-rename}, {new-sele-name}
Command Line Selections
While mouse selections provide an intuitive way for selecting atoms or residues, it doesn’t scale well to highly complex selections (E.g., specific subset of residues across all chains). To create complex selections, using the command line often offers greater flexibility and functionality. You’ve already seen some basic use cases throughout this guide whenever I’ve used {selection-expression}, but let’s dig deeper into the command line.
Command line selections are done through the select command (often shortened to sele):
# Selection
sele {selection-name}, {selection-expression}

# Selection to temporary "sele"
See {selection-expression}
Selection Expressions
At the heart of command line selections are the selection expressions, which I’ve denoted as selection-expression when they have come up previously. These can get enormously complicated, so I’ll cover the two basic sets that you should know. For the other sets, you can refer to the PyMOL documentation.
Selection Properties
| Property Selector | Short Form Selector | Identifier and Example |
|---|---|---|
| name | n | Atom Nameselect name c+o+n+ca |
| resn | r | Residue Name (Three Letter Code)select resn glu |
| resi | i | Residue Number (Integer Index)select resi 200 |
| chain | c | PDB Chainselect chain a |
| ss | ss | Secondary Structure (h = helix, s = sheet, l = loop) select ss h |
Selection properties are the basic selection units, comparable to using different mouse selection modes. For most selections, you will be utilizing at least one of these properties. Some examples of using these for complex selections are shown below:
### Selection Property Examples ###

# Select backbone atoms (N, C, CA) and create a "bb" selection
sele bb, name n+c+ca

# Select alanine residues
sele rest ala

# Select residues by number
sele active-site, resid 10+11+20+22
Selection Algebra
| Operator | Shortcut | Effect |
|---|---|---|
| not s1 | ! s1 | Selects atoms not in s1 |
| s1 and s2 | s1 & s2 | Selects atoms in both s1 and s2 |
| s1 or s2 | s1 | s2 | Selects atoms in either s1 and s2 |
| s1 in s2 | s1 in s2 | Selects atoms in s1 whos identifiers match s2 |
Selection algebra allows you to narrow down your selections by combining conditions. Some illustrative examples are included below:
### Selection Algebra Examples

# Select glutamine residues only in chain A
sele rest glu in chain A

# Select active site in chain A and chain B
sele active-site in (chain A or chain B) # Notice parentheses for order
Proximity Selections
Proximity Selection Expressions
| Operator | Shortcut | Effect |
|---|---|---|
| s1 within {dist} of s2 | w | Selects atoms in s1 that are within {dist} angstroms of s2 |
| s1 around {dist} | a | Selects atoms with centers within {dist} angstroms of atoms in s1 |
| s1 expand {dist{ | x | Expands s1 by including atoms within {dist} angstroms of atoms in s1 |
Proximity selections are useful for selecting atoms around a residue of choice (See Hands-on Exercise 7 for a practical application of “expand”). Instead of using the command line expression, you can find this under the Action button.
Hands-on Exercise 5: Create a selection called “bb_chainA” containing the backbone atoms (nitrogen, alpha carbon, and carbon) only from chain A.
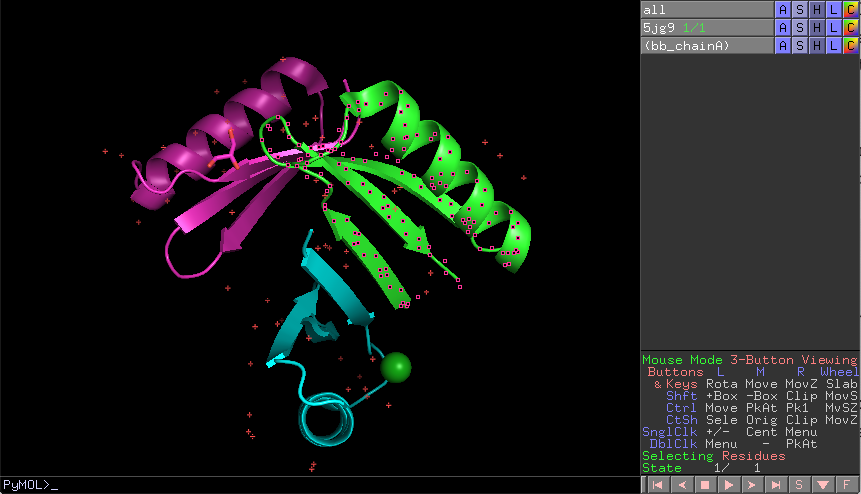 Exercise 5: PyMOL window with the correct selection
Working with Objects
The last fundamental skill for working with PyMOL is working with objects. Objects contain the underlying data that you work with: the atom types, locations, secondary structure categorization, and much more.
Hands-on Exercise Step: Reinitialize PyMOL to an empty state using the reinit command and reload PDB 5JG9.
Creating Objects
There are two primary inputs to creating a new object: (1) Loading in new data (E.g., PDB files) and (2) Creating a new object from one previously loaded. The first follows the same workflow that I introduced at the start of the guide (Loading and Fetching Data) and will not be covered in this section. Please refer to earlier in the guide if you have questions.
The second input method is a little more complicated. In most cases, you would want to create a new object based on a selection from a previous one (E.g., creating an object containing just Chain A). To create a new object using the mouse and user interface, use the Action button and select “copy to object” or “extract object.”
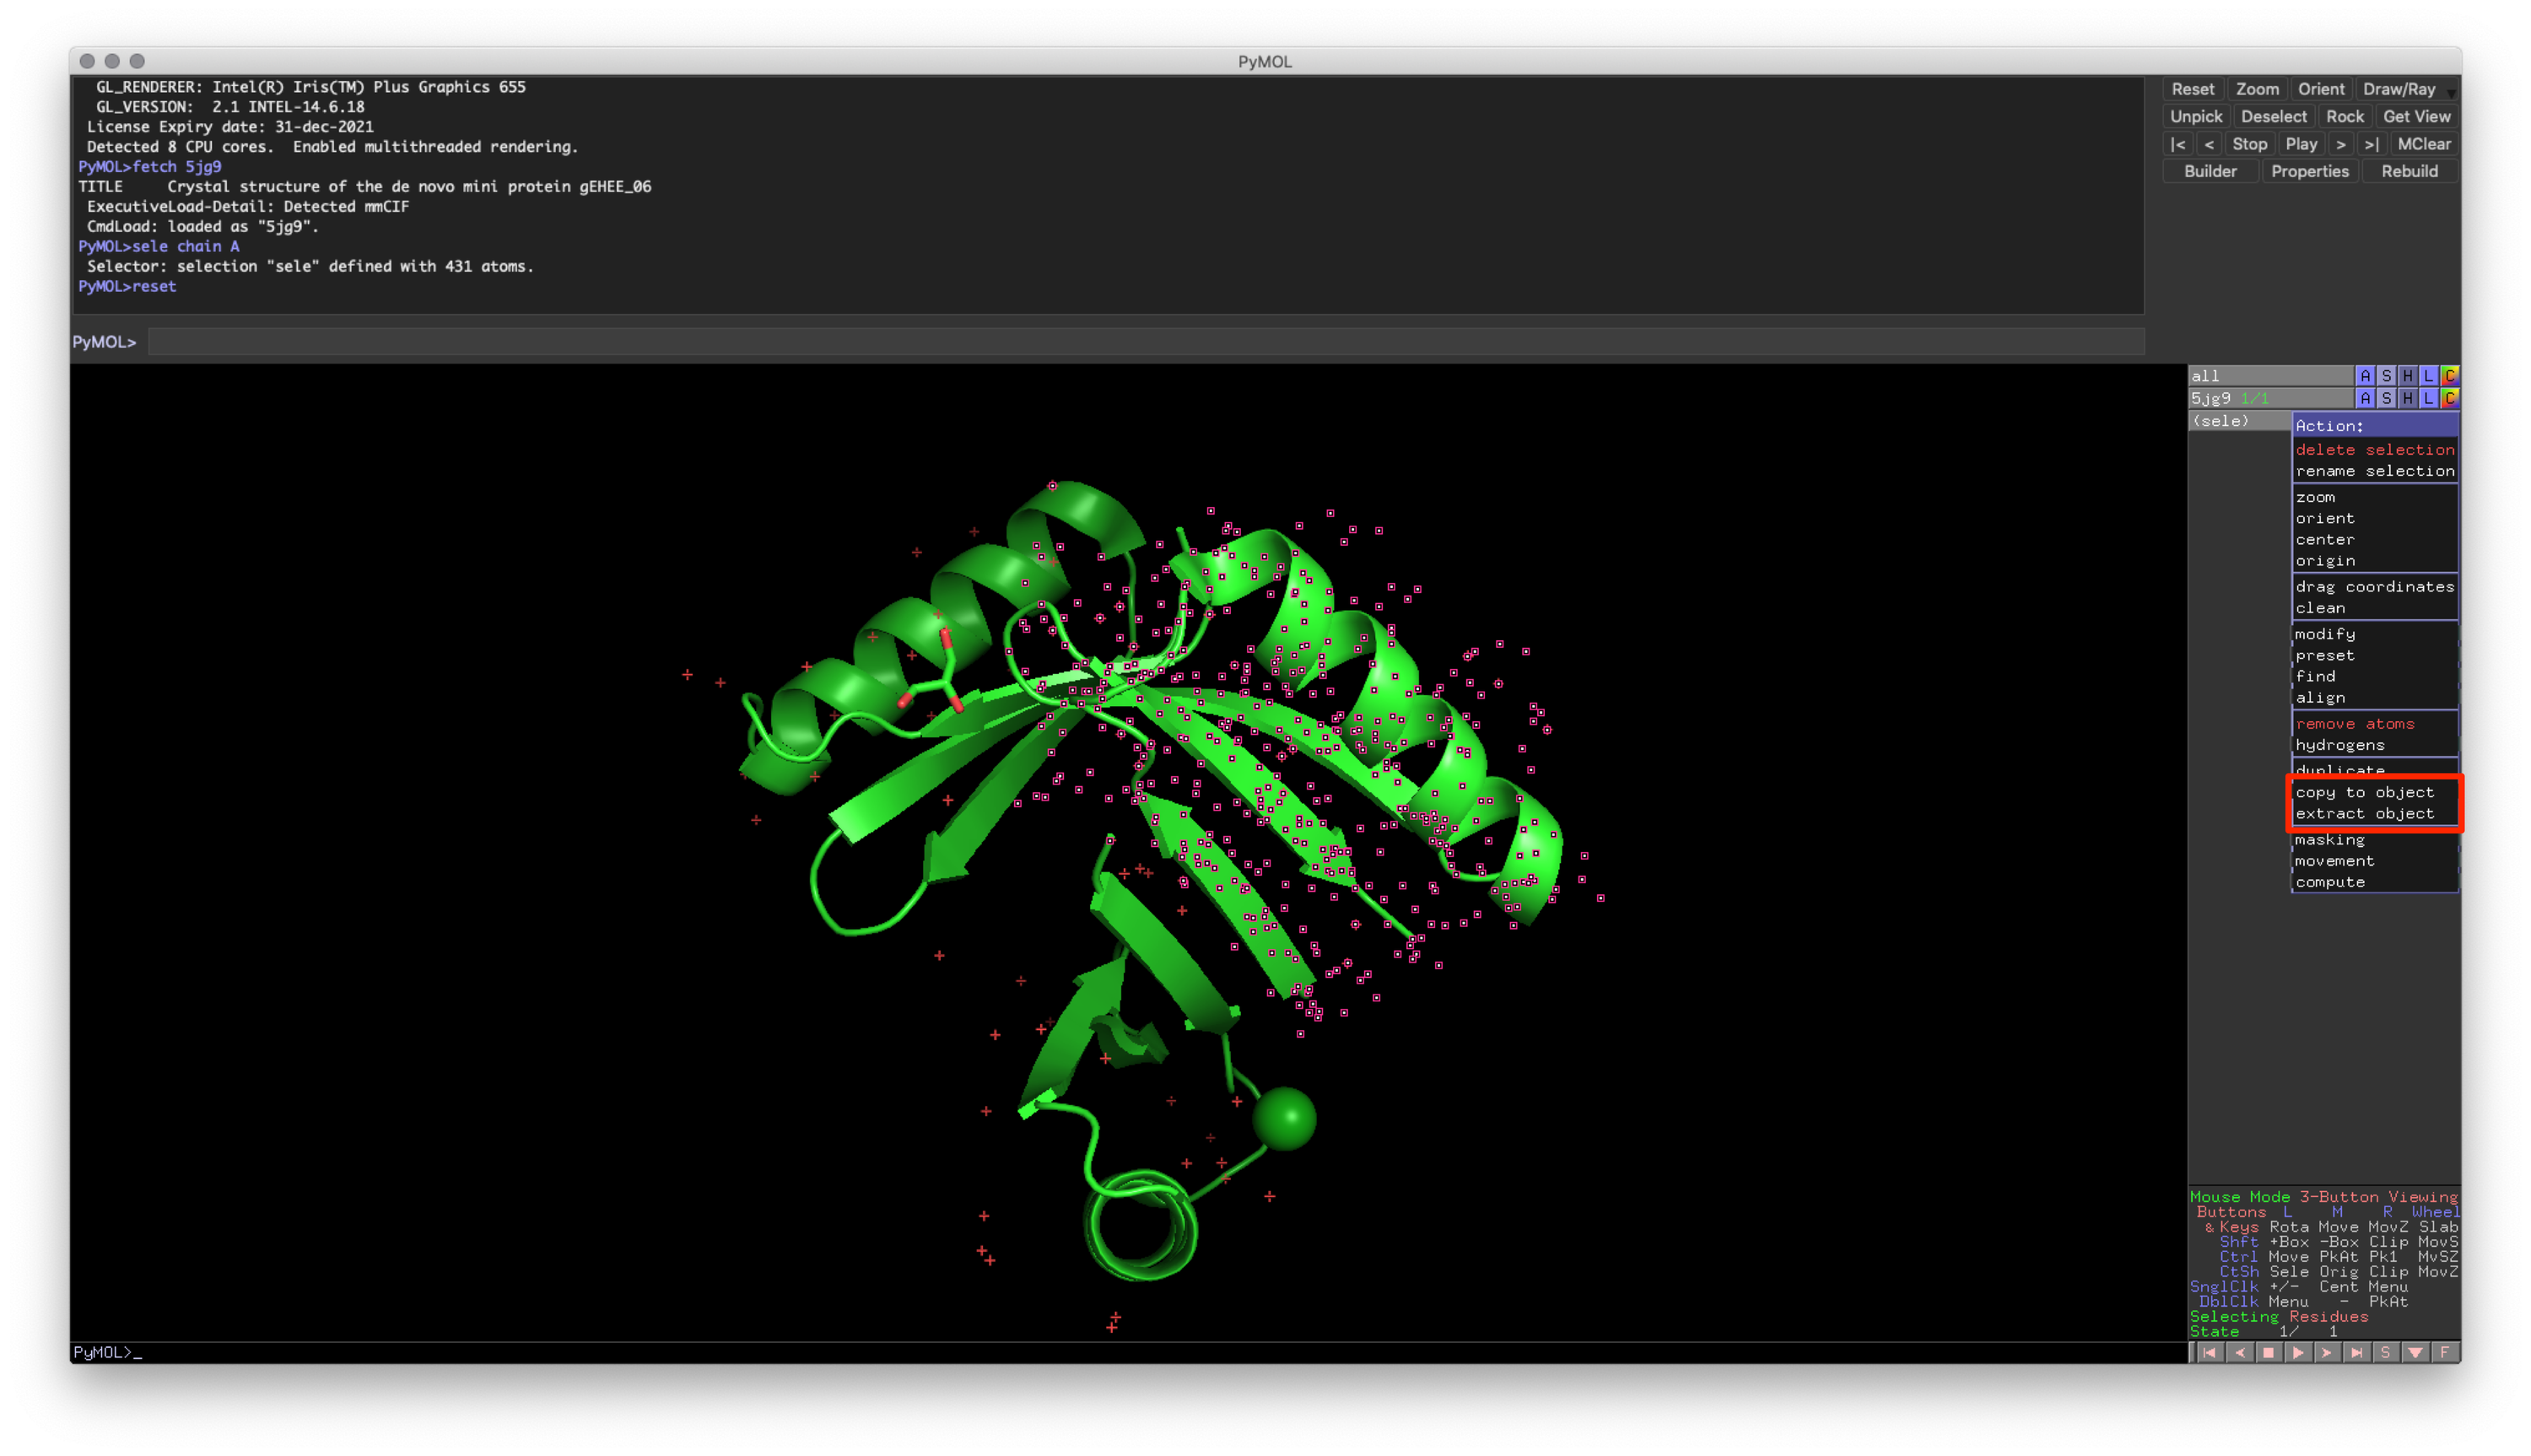 Fig. 4: Location of object creation using Action button on a selection
This approach provides you with two options:
- Copy: Copies the atoms from the original object
- Extract: Removes the atoms from the original object
Alternatively, you can use command line commands for the same functionality. Like selections, the command line commands allow for more straightforward implementation of complex subsets.
### Create object from selected atoms (Analogous to Copy)
create {object-name}, {selection-expression}

### Extract selected atoms from object (Analogous to Extract)
extract {object-name}, {selection-expression}
Hands-on Exercise 6: Create chain A from our molecule and store it in a new object, chainA.
 Hands-on Exercise 6: PyMOL windows showing a new chain A
Relationship between Objects and Selections
It’s important to note that there is a crucial link between selections and objects. Selections are tied to a specific object. Even if the selection appears to overlap (such as in the Hands-on Exercise 6), any changes you make to a selection on the original object will no longer apply to your new copy. Before moving on to the final sections, try experimenting to ensure you’re comfortable with this link, as it is a common source of confusion for new PyMOL users.
Closing
Congratulations! At this point, you now have all of the necessary skills for using PyMOL! We’ve seen how to:
- Use the PyMOL user interface
- Load in data from local files or directly from the PDB
- Control the camera and view
- Visualize different representations of our molecules
- Use selections to work on subsets of atoms
- Create and manipulate various objects
With these skills under your belt, you have everything you need to tackle basic modeling problems or figure creation! More importantly, you now have the skills required to learn and address complex modeling techniques in PyMOL. To learn more about some of these techniques, check out Part 2 of this guide.
Updates
2020-06-25: Addressed typos and added links to part 2
Bhardwaj, Gaurav, Vikram Khipple Mulligan, Christopher D. Bahl, Jason M. Gilmore, Peta J. Harvey, Olivier Cheneval, Garry W. Buchko, et al. 2016. “Accurate de Novo Design of Hyperstable Constrained Peptides.” Nature 538 (7625): 329–35. https://doi.org/10.1038/nature19791.↩